
Mastering Your Epson Printer: A Comprehensive Guide to Efficient Printing

Epson printers are renowned for their reliability and versatility, making them a popular choice for both home and office use. If you've recently purchased an Epson printer and want to make the most of its features, you're in the right place. In this comprehensive guide, we'll walk you through everything you need to know to use your Epson printer effectively, from setting it up to performing advanced printing tasks and troubleshooting common issues.
1. Setting Up Your Epson Printer
Before you can start using your Epson printer, you'll need to set it up properly. Follow these steps for a smooth setup process:
- Unbox your Epson printer and remove all packaging materials.
- Connect the printer to a power source and turn it on.
- Install the ink cartridges and load paper into the paper tray.
- Connect the printer to your computer or network using a USB cable or wireless connection.
- Install any necessary printer drivers and software on your computer.
Once your Epson printer is set up and connected, you're ready to start printing!
2. Basic Printing
Printing documents and photos from your Epson printer is easy. Here's how to do it:
- Open the document or photo you want to print on your computer.
- Select the "Print" option from the File menu or press Ctrl + P (Cmd + P on Mac).
- Choose your Epson printer from the list of available printers.
- Adjust print settings such as paper size, orientation, and quality as needed.
- Click "Print" to send the document to your Epson printer.
3. Scanning
Many Epson printers also feature scanning capabilities, allowing you to digitize documents and photos with ease. Here's how to scan using your Epson printer:
- Place the document or photo you want to scan on the scanner glass or in the document feeder.
- Open the scanning software on your computer.
- Select the type of scan you want to perform, such as a color or black-and-white scan.
- Adjust scan settings such as resolution, file format, and destination folder as needed.
- Click "Scan" to start the scanning process.
4. Copying
If your Epson printer has a built-in copier, you can use it to make copies of documents and photos. Here's how to make a copy:
- Place the document or photo you want to copy on the scanner glass or in the document feeder.
- Press the "Copy" button on your printer's control panel.
- Select the number of copies you want to make and adjust any other settings as needed.
- Press the "Start" button to begin the copying process.
5. Advanced Printing Features
Epson printers offer a range of advanced printing features to enhance your printing experience. Here are some useful features to explore:
- Borderless printing: Print photos without borders for a professional look.
- Duplex printing: Print on both sides of the paper to save paper and reduce waste.
- Custom print layouts: Create custom print layouts for specialized printing tasks.
- Mobile printing: Print from your smartphone or tablet using Epson's mobile printing apps.
6. Troubleshooting Common Issues
If you encounter any issues while using your Epson printer, don't worry. Many common problems can be easily resolved with a few simple steps. Here are some troubleshooting tips to try:
- Check the printer's status: Make sure the printer is powered on and connected to your computer or network.
- Update printer drivers: Install the latest printer drivers and software updates from the Epson website.
- Clear print queue: If a print job is stuck in the print queue, cancel the job and try printing again.
- Clean the printhead: If your prints are coming out blurry or streaky, clean the printhead using the printer's utility software.
Conclusion
Congratulations! You've mastered the art of using your Epson printer like a pro. By following the steps outlined in this guide, you can take full advantage of your printer's features and capabilities. Whether you're printing documents, scanning photos, or making copies, you now have the knowledge and skills to get the job done efficiently and effectively.
For additional assistance or troubleshooting, refer to the user manual for your Epson printer model or visit the Epson support website for helpful resources and guides.
Installing the Epson Universal Print Driver - Windows
The Epson Universal Print Driver supports multiple printer languages, such as PCL and ESC/P-R, and can be installed on a Windows computer.
- Download the EPSON Universal Print Driver from epson.com/support/wf6090.
- Double-click the downloaded package.
Follow the on-screen instructions until you see this screen:
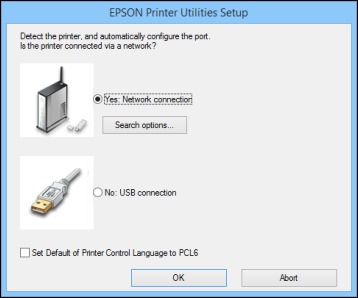
Select Yes: Network connection and click OK.
Note: Select the Set Default of Printer Control Language to PCL6 checkbox if you want to set the default printer language to PCL6. Leave this option deselected to set the printer language to ESC/P-R. (You can change this setting later as needed.)After the software finishes searching for products, you see a screen like this:

- Do one of the following:
- If you are installing one product, make sure Add EPSON Universal Print Driver is selected and continue with the next step.
If you are installing more than one product, select Add found printers and go to step 9.
Note: You can customize and filter your product search results by clicking Display Settings.
- Open the Select a port to connect a printer menu and select an existing printer port, if necessary. Otherwise, skip this option to create a new port automatically.
Select the product you want to install from the Found Printers list.
Note: Deselect the Set as default printer checkbox if you do not want the product to be set as your default printer.- Click OK, then skip the remaining steps.
If you are installing more than one product, select the products from the Found Printers list and click Add to Printer Folder.
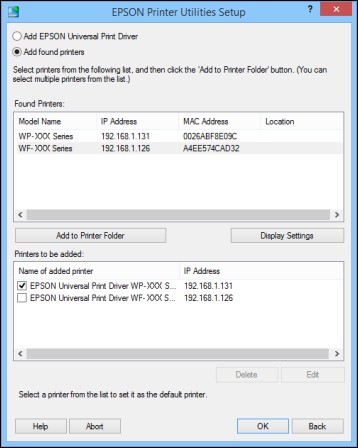
The selected products appear in the lower section of the screen.
- Select the checkbox next to the product you want to make your default printer, if necessary.
- Click OK.