
Latest Guide: How Do I Install a New Epson Printer Driver?

Epson printers are revered for their exceptional quality, reliability, and performance. However, to ensure they operate at peak efficiency, it's imperative to keep their software drivers up to date. These drivers act as the vital link between your printer and computer, facilitating seamless communication and precise print execution.
Why Updating Printer Drivers is Essential
It is crucial that you always have the most recent Epson printer drivers installed. First off, you may greatly improve your printing experience by using current drivers, which frequently include bug fixes and efficiency improvements. Additionally, they offer seamless integration with your setup by being compatible with the newest operating systems and apps.
Step-by-Step Guide to Installing a New Epson Printer Driver
Step 1: Determine Your Printer Model
Determine the model of your Epson printer first. This information is typically located on the printer's top or front. As an alternative, you can visit the Epson website or consult the printer's instructions.
Step 2: Visit the Epson Support Website
After obtaining the model number, proceed to the official Epson support webpage. To find the exact printer model you own, navigate to the "Drivers and Downloads" area.
Step 3: Download the Driver
Find the driver that works with your operating system, then download it to your PC. Make sure you choose the appropriate version to prevent incompatibilities.
Step 4: Run the Installer
When the download is finished, find the installation file in the location where you downloaded files, and double-click it to launch it. To get started with the installation, adhere to the on-screen directions.
Step 5: Accept Terms and Conditions
You might be asked to agree to the software's terms and conditions before continuing with the installation. Click "Agree" to proceed after carefully reading the terms.
Step 6: Connect the Printer
At this point, make sure your Epson printer is turned on and linked to your computer using a USB connection or wireless network. Once the linked device has been identified, the installer will start the installation.
Step 7: Complete the Installation
To adjust printer settings or run a test print, adhere to any further instructions. A confirmation message stating that the driver has been successfully installed will be sent to you after the installation is finished.
Step 8: Restart Your Computer
To ensure that the changes take effect, it's recommended to restart your computer after installing the new Epson printer driver.
Congratulations! You're Ready to Print
In Conclusion
It doesn't have to be difficult to update the driver for your Epson printer. You may easily guarantee flawless connection between your computer and printer with the help of our detailed guide on How to Install a New Epson Printer Driver. To keep performance at its best, don't forget to check for updates on a regular basis.
Installing the Epson Universal Print Driver - Windows
The Epson Universal Print Driver supports multiple printer languages, such as PCL and ESC/P-R, and can be installed on a Windows computer.
- Download the EPSON Universal Print Driver from epson.com/support/wf6090.
- Double-click the downloaded package.
Follow the on-screen instructions until you see this screen:
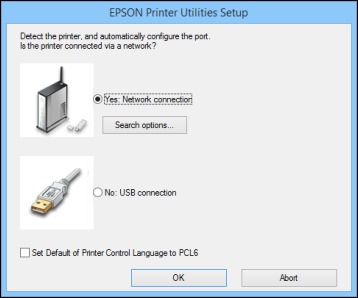
Select Yes: Network connection and click OK.
Note: Select the Set Default of Printer Control Language to PCL6 checkbox if you want to set the default printer language to PCL6. Leave this option deselected to set the printer language to ESC/P-R. (You can change this setting later as needed.)After the software finishes searching for products, you see a screen like this:

- Do one of the following:
- If you are installing one product, make sure Add EPSON Universal Print Driver is selected and continue with the next step.
If you are installing more than one product, select Add found printers and go to step 9.
Note: You can customize and filter your product search results by clicking Display Settings.
- Open the Select a port to connect a printer menu and select an existing printer port, if necessary. Otherwise, skip this option to create a new port automatically.
Select the product you want to install from the Found Printers list.
Note: Deselect the Set as default printer checkbox if you do not want the product to be set as your default printer.- Click OK, then skip the remaining steps.
If you are installing more than one product, select the products from the Found Printers list and click Add to Printer Folder.
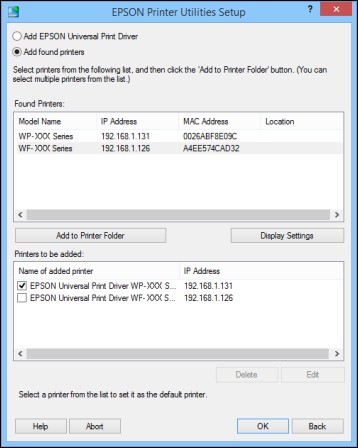
The selected products appear in the lower section of the screen.
- Select the checkbox next to the product you want to make your default printer, if necessary.
- Click OK.