
How to Connect Epson Printer to Wi-Fi?

Epson, a leading brand in printing technology, offers a diverse array of printers packed with cutting-edge features, including seamless wireless connectivity. Elevating your printing experience, connecting your Epson printer to Wi-Fi not only adds convenience but also enables effortless printing from numerous devices across your network. In this comprehensive guide, we'll navigate you through the step-by-step process of how to connect epson printer to wifi, while also addressing prevalent issues such as the Epson printer not printing.
The Significance of Wi-Fi Connectivity for Epson Printers:
Before diving into the setup intricacies, let's delve into why Wi-Fi connectivity is indispensable for contemporary printers. Gone are the days of tangled cables and limited connectivity options. With Wi-Fi-enabled printers like those from Epson, you unlock a host of benefits:
Wireless Printing Convenience: Bid farewell to the hassle of physical connections between your printer and various devices. With Wi-Fi connectivity, printing becomes a breeze from anywhere within your Wi-Fi network, enhancing flexibility and convenience.
Multi-Device Compatibility: Connecting your Epson printer to Wi-Fi ensures seamless printing from multiple devices without the hassle of switching cables or transferring files. Whether it's documents, photos, or presentations, Wi-Fi connectivity guarantees compatibility across different devices and operating systems.
Enhanced Productivity: Embrace wireless printing capabilities to streamline your workflow and amplify productivity. Whether you're stationed at home, in the office, or on the move, effortlessly dispatch print jobs to your Epson printer without being tethered to a specific location.
Step-by-Step Guide How to Connect Epson Printer to Wi-Fi:
Preparation: Ensure the operational status of your Wi-Fi network and keep the network name (SSID) and password accessible.
Power On: Activate your Epson printer and navigate to the Settings menu on its control panel.
Wi-Fi Setup: Opt for "Wi-Fi Setup" or "Network Settings" and select your Wi-Fi network from the available list.
Enter Credentials: Input the Wi-Fi password when prompted, ensuring precision to avoid typos.
Confirmation: Upon accurate entry of credentials, the printer will attempt to connect to the network. A confirmation message will be displayed upon successful connection.
Troubleshooting: What to Do When Your Epson Printer Isn't Printing:
Despite the straightforward setup, encountering instances where your Epson printer refuses to print is plausible. If you're grappling with the "Epson printer not printing" dilemma, here are troubleshooting steps to navigate common issues:
- Check Connectivity: Confirm that your printer maintains connectivity to the Wi-Fi network. Occasional power outages or network glitches might disrupt connectivity.
- Printer Queue: Clear any pending print jobs in the printer queue, as a backlog can impede new printing tasks.
- Driver Updates: Ensure your printer drivers are up to date to mitigate compatibility issues that hinder printing functionality.
- Restart Devices: Attempt restarting both your printer and the device initiating the print command, as this simple step often resolves connectivity hiccups.
Tips for Maintaining a Stable Wi-Fi Connection for Your Epson Printer:
- Optimal Placement: Position your Epson printer within the Wi-Fi router's range to ensure a robust signal.
- Firmware Updates: Routinely check for firmware updates for your printer to enhance performance and resolve connectivity concerns.
- Network Security: Safeguard your Wi-Fi network with a robust password to thwart unauthorized access and uphold the integrity of your printing tasks.
- Router Configuration: Fine-tune router settings like channel selection and bandwidth allocation to optimize Wi-Fi performance for your printer.
Conclusion:
In essence, connecting your Epson printer to Wi-Fi is a seamless endeavor that enriches your printing journey. By adhering to the step-by-step guide and implementing the troubleshooting tips provided herein, you can overcome connectivity hurdles and relish seamless printing from any device. Remember to keep your printer firmware updated and periodically address any network-related issues for optimal performance. Bid adieu to the frustration of encountering printing woes and embrace the convenience of wireless printing today!
Installing the Epson Universal Print Driver - Windows
The Epson Universal Print Driver supports multiple printer languages, such as PCL and ESC/P-R, and can be installed on a Windows computer.
- Download the EPSON Universal Print Driver from epson.com/support/wf6090.
- Double-click the downloaded package.
Follow the on-screen instructions until you see this screen:
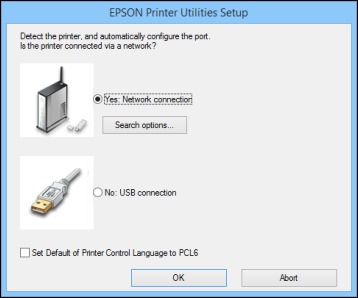
Select Yes: Network connection and click OK.
Note: Select the Set Default of Printer Control Language to PCL6 checkbox if you want to set the default printer language to PCL6. Leave this option deselected to set the printer language to ESC/P-R. (You can change this setting later as needed.)After the software finishes searching for products, you see a screen like this:

- Do one of the following:
- If you are installing one product, make sure Add EPSON Universal Print Driver is selected and continue with the next step.
If you are installing more than one product, select Add found printers and go to step 9.
Note: You can customize and filter your product search results by clicking Display Settings.
- Open the Select a port to connect a printer menu and select an existing printer port, if necessary. Otherwise, skip this option to create a new port automatically.
Select the product you want to install from the Found Printers list.
Note: Deselect the Set as default printer checkbox if you do not want the product to be set as your default printer.- Click OK, then skip the remaining steps.
If you are installing more than one product, select the products from the Found Printers list and click Add to Printer Folder.
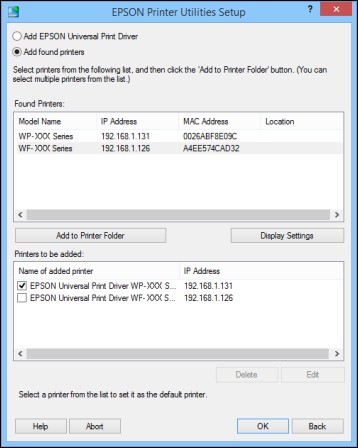
The selected products appear in the lower section of the screen.
- Select the checkbox next to the product you want to make your default printer, if necessary.
- Click OK.