
How Do I Install an Epson Printer on My Computer?

If you have recently purchased an Epson printer and are eager to start using it, the first step is to ensure it is correctly installed on your computer. Installing an Epson printer involves a few simple steps, but it's essential to do it correctly to avoid any issues with printing later on. In this guide, we'll walk you through the process of install Epson printer on computer, ensuring a seamless setup.
Epson printers are renowned for their reliability and top-notch printing capabilities. Whether you're a home user or a business professional, optimizing your Epson printer's performance begins with a seamless installation process. Let's dive into the steps to ensure you get the most out of your investment.
Check Compatibility
Before diving into the installation process, it's crucial to ensure your Epson printer is fully compatible with your computer. Verify that it supports your operating system, whether it's Windows or macOS. Additionally, double-check your computer's specifications to meet the requirements specified by Epson for your printer model.
Prepare for Installation
Get ready to unleash the power of your Epson printer by unboxing it and gathering all the essential components - the printer itself, power cable, ink cartridges, and accompanying documentation. Position the printer near your computer, ensuring easy access to a power source.
Connect Seamlessly
Epson offers flexibility in connectivity, allowing you to choose between USB or Wi-Fi connection options based on your preferences and printer model capabilities. For a USB connection, simply plug the cable into both the printer and an available USB port on your computer. If opting for wireless connectivity, follow Epson's instructions to connect your printer to your Wi-Fi network effortlessly.
Install Essential Drivers
Before embarking on your printing journey, ensure you have the necessary drivers installed on your computer. Head over to Epson's official website, locate the support section, and download the latest drivers tailored to your operating system and printer model. Execute the driver file, following on-screen prompts for a hassle-free installation.
Complete Setup with Ease
After driver installation, a quick restart of your computer ensures seamless integration. Now, it's time to fine-tune your printer settings according to your preferences. Consult your printer's user manual for guidance on configuring settings such as paper size and print quality. Finish by printing a test page to confirm everything is in perfect order.
Troubleshooting Tips
Even with careful preparation, you may encounter issues during the installation process. Here are some common problems and their solutions:
- Driver Compatibility: Ensure that you've downloaded the correct drivers for your printer model and operating system.
- Connection Issues: Check that the USB cable is securely connected to both the printer and the computer.
- Driver Installation Errors: If you encounter errors during the installation process, try restarting your computer and reinstalling the drivers.
If you're unable to resolve the issue on your own, don't hesitate to contact Epson customer support or seek assistance from a professional technician.
Conclusion
Install Epson printer on your computer is a straightforward process that can be completed in just a few simple steps. By following the step-by-step guide outlined above, you can ensure a smooth installation experience and start enjoying high-quality prints in no time.
Installing the Epson Universal Print Driver - Windows
The Epson Universal Print Driver supports multiple printer languages, such as PCL and ESC/P-R, and can be installed on a Windows computer.
- Download the EPSON Universal Print Driver from epson.com/support/wf6090.
- Double-click the downloaded package.
Follow the on-screen instructions until you see this screen:
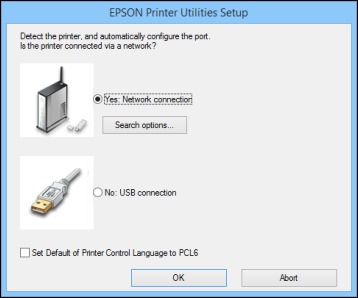
Select Yes: Network connection and click OK.
Note: Select the Set Default of Printer Control Language to PCL6 checkbox if you want to set the default printer language to PCL6. Leave this option deselected to set the printer language to ESC/P-R. (You can change this setting later as needed.)After the software finishes searching for products, you see a screen like this:

- Do one of the following:
- If you are installing one product, make sure Add EPSON Universal Print Driver is selected and continue with the next step.
If you are installing more than one product, select Add found printers and go to step 9.
Note: You can customize and filter your product search results by clicking Display Settings.
- Open the Select a port to connect a printer menu and select an existing printer port, if necessary. Otherwise, skip this option to create a new port automatically.
Select the product you want to install from the Found Printers list.
Note: Deselect the Set as default printer checkbox if you do not want the product to be set as your default printer.- Click OK, then skip the remaining steps.
If you are installing more than one product, select the products from the Found Printers list and click Add to Printer Folder.
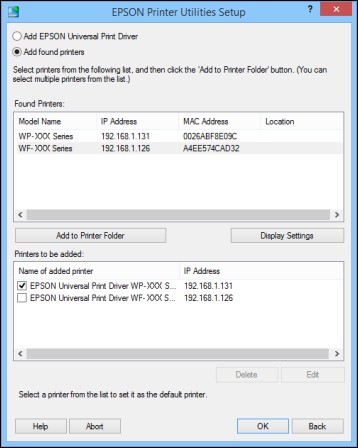
The selected products appear in the lower section of the screen.
- Select the checkbox next to the product you want to make your default printer, if necessary.
- Click OK.