
How Do I Set up My Epson Printer?

Epson printers stand as paragons of reliability and excellence in print quality, rendering them an esteemed choice for both household and professional settings. While the initial setup Epson printer might initially appear daunting, fear not, for with proper guidance, it unfolds into a simple and seamless process. Within this comprehensive guide, we shall escort you through each phase of the setup journey, from the moment you unbox your printer to the exhilarating moment of witnessing your first test prints.
Unwrapping Your Epson Printer
Unveiling the Contents
Upon receiving your Epson printer, delicately unwrap the contents of the package. Among them, you'll discover the printer itself, accompanied by ink cartridges, a power cord, a USB cable (if applicable), and any pertinent documentation or installation CDs.
Initial Configuration Steps
Commence by liberating the printer from all protective tapes and materials. Ensure your workspace is uncluttered, ideally stationed near a power source and your computer or network router.
Powering Up Your Epson Printer
Plugging In and Activating
Link the power cord to the printer and connect it to a power outlet. Engage the printer by pressing the power button, typically situated on the control or front panel.
Navigating the Control Panel
Take a moment to acquaint yourself with the printer's control panel. Depending on the model, it may feature navigation buttons, a display screen, and indicator lights.
Installing Ink Cartridges
Accessing the Cartridge Bay
Open the ink cartridge cover or access door to expose the cartridge bay. Ensure the printer is powered on before proceeding.
Inserting the Cartridges
Unpack each ink cartridge and insert them into their designated slots, adhering to the color-coded labels. Gently press down until each cartridge audibly clicks into position.
Loading Paper into the Printer
Overview of the Paper Tray
Locate the paper input tray of your Epson printer. Adjust the tray guides to accommodate the paper size you intend to use, be it letter, legal, or photo paper.
Configuring Paper Settings
Specify the paper type and size on your computer or the printer's control panel to ensure optimal print quality and avert paper jams.
Connecting Your Printer to a Computer or Network
Wired Connection
For a wired connection, attach one end of the USB cable to the printer and the other to your computer. Follow any on-screen prompts for driver installation, if required.
Wireless Connection
Opting for a wireless connection? Navigate to the printer's settings menu and select your desired Wi-Fi network. Input the network password if prompted, and await connection establishment.
Installing Printer Drivers and Software
Acquiring Drivers
Visit the Epson website, head to the support section, and input your printer model number to download the latest drivers compatible with your operating system.
Software Installation
Execute the driver installation file and adhere to the on-screen instructions to install the requisite software for your Epson printer, unlocking additional features and functionalities.
Executing Test Prints
Verifying Connectivity
Initiate a test print to validate that your printer is correctly configured and connected to your computer or network. Monitor for any anomalies or errors during the printing process.
Ensuring Print Fidelity
Thoroughly scrutinize the test print for clarity, color precision, and alignment. Should adjustments be necessary, calibrate your printer or tweak settings to achieve desired outcomes.
Addressing Common Issues
Paper Jams
Encountered a paper jam? Methodically clear any lodged paper from the printer's paper path, consulting the printer's manual for precise directives on resolving jams.
Connectivity Hitches
If your printer displays unresponsiveness or connectivity glitches, inspect your network connection and reboot both the printer and your computer.
Maintenance Tips for Your Epson Printer
Caring for Your Device
Regularly cleanse both the exterior and interior of your Epson printer setup to thwart dust accumulation and uphold optimal functionality. Utilize a soft, lint-free cloth while abstaining from liquid cleaners.
Firmware Updates
Periodically check for firmware updates tailored for your Epson printer and implement them as recommended. These updates may encompass enhancements, bug rectifications, and novel features.
Conclusion
Embarking on set up the voyage of your Epson printer need not be a labyrinthine ordeal. By adhering to the outlined steps in this guide "How Do I Set up My Epson Printer?", you'll swiftly navigate the setup terrain, ushering your printer into operation, poised to deliver pristine prints for all your endeavors.
Installing the Epson Universal Print Driver - Windows
The Epson Universal Print Driver supports multiple printer languages, such as PCL and ESC/P-R, and can be installed on a Windows computer.
- Download the EPSON Universal Print Driver from epson.com/support/wf6090.
- Double-click the downloaded package.
Follow the on-screen instructions until you see this screen:
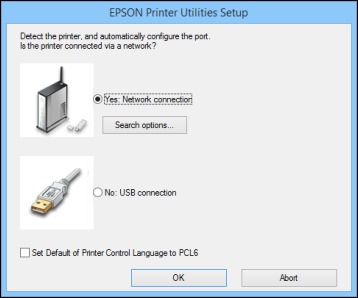
Select Yes: Network connection and click OK.
Note: Select the Set Default of Printer Control Language to PCL6 checkbox if you want to set the default printer language to PCL6. Leave this option deselected to set the printer language to ESC/P-R. (You can change this setting later as needed.)After the software finishes searching for products, you see a screen like this:

- Do one of the following:
- If you are installing one product, make sure Add EPSON Universal Print Driver is selected and continue with the next step.
If you are installing more than one product, select Add found printers and go to step 9.
Note: You can customize and filter your product search results by clicking Display Settings.
- Open the Select a port to connect a printer menu and select an existing printer port, if necessary. Otherwise, skip this option to create a new port automatically.
Select the product you want to install from the Found Printers list.
Note: Deselect the Set as default printer checkbox if you do not want the product to be set as your default printer.- Click OK, then skip the remaining steps.
If you are installing more than one product, select the products from the Found Printers list and click Add to Printer Folder.
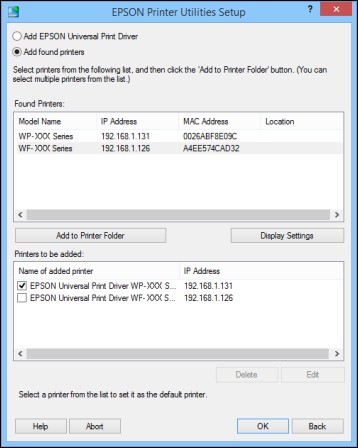
The selected products appear in the lower section of the screen.
- Select the checkbox next to the product you want to make your default printer, if necessary.
- Click OK.