
Epson EcoTank ET-2850 Support Epson Printer USA

Comprehensive Guide to Epson EcoTank ET-2850 Printer Support
The Epson EcoTank ET-2850 is a versatile all-in-one printer known for its high-quality prints and cost-effective EcoTank technology. Like any electronic device, it may encounter issues from time to time that require troubleshooting and support. In this comprehensive guide, we'll cover everything you need to know about supporting and troubleshooting the Epson EcoTank ET-2850 printer, ensuring optimal performance and longevity.
1. Understanding Common Printer Issues
Before diving into troubleshooting, it's essential to familiarize yourself with common issues that users may encounter with the Epson EcoTank ET-2850 printer:
- Paper jams: Paper jams are a common occurrence and can occur due to misaligned paper, worn rollers, or debris in the paper path.
- Print quality issues: Print quality issues such as blurry prints, streaks, or faded colors may be caused by clogged printheads, low ink levels, or incorrect print settings.
- Connectivity problems: Connectivity problems may prevent the printer from connecting to a computer or wireless network, resulting in print errors or offline status.
2. Troubleshooting Printer Issues
When troubleshooting printer issues, it's essential to follow a systematic approach to identify and resolve the problem effectively. Here's a step-by-step troubleshooting process for the Epson EcoTank ET-2850 printer:
- Check for paper jams: Open the printer cover and carefully remove any jammed paper or debris from the paper path.
- Verify ink levels: Check the ink levels in the printer's ink tanks and replace any empty cartridges if necessary.
- Clean the printheads: Use the printer's utility software to clean the printheads and improve print quality.
- Restart the printer: Power off the printer, unplug it from the power source, and wait for a few minutes before plugging it back in and powering it on.
- Update printer firmware: Check for and install any available firmware updates for the printer to fix bugs and improve performance.
- Test print: Print a test page to verify that the printer is functioning correctly after troubleshooting.
3. Online Support Resources
If you're unable to resolve the issue on your own, Epson offers a range of online support resources to assist you:
- Epson Support Website: Visit the Epson support website to access troubleshooting guides, FAQs, drivers, and software downloads for the Epson EcoTank ET-2850 printer.
- User Manual: Refer to the printer's user manual for detailed instructions on setup, operation, and troubleshooting.
- Community Forums: Participate in online community forums to seek advice and assistance from other Epson printer users and experts.
4. Contacting Epson Customer Support
If you're still unable to resolve the issue, you can contact Epson customer support for personalized assistance:
- Phone Support: Call Epson's customer support hotline to speak with a representative who can provide troubleshooting assistance over the phone.
- Live Chat: Use Epson's live chat feature on their website to chat with a support agent in real-time and get immediate assistance.
- Email Support: Send an email to Epson's customer support team outlining the issue you're experiencing, and they will respond with personalized assistance.
Conclusion
With the information provided in this guide, you'll be well-equipped to support and troubleshoot the Epson EcoTank ET-2850 printer effectively. By following the troubleshooting steps outlined here and leveraging Epson's online support resources, you can address any issues that may arise and keep your printer running smoothly.
For additional assistance or support, don't hesitate to reach out to Epson customer support or explore the online support resources available on the Epson website.
The Epson ET-2850 is a versatile all-in-one printer known for its high-quality prints and cost-effective EcoTank technology. Whether you're setting up a new printer or reinstalling an existing one, proper installation is essential for optimal performance. In this comprehensive guide, we'll walk you through the step-by-step process of installing the Epson ET-2850 printer, ensuring a smooth and hassle-free setup experience.
1. Unboxing Your Epson ET-2850
Start by carefully unpacking your Epson ET-2850 printer and removing all packaging materials. Ensure that all components, including the printer, ink bottles, power cord, and user manual, are present and undamaged.
2. Preparing Your Workspace
Find a suitable location for your Epson ET-2850 printer near a power outlet and your computer or wireless network router. Make sure the area is well-ventilated and free from obstructions. Clear a flat, stable surface for the printer to sit on during setup.
3. Connecting the Power
Plug one end of the power cord into the back of the printer and the other end into a nearby power outlet. Press the power button to turn on the printer and wait for it to initialize.
4. Installing Ink into the EcoTank
The Epson ET-2850 utilizes EcoTank technology, which means you'll need to fill the ink tanks before printing. Follow these steps to fill the ink tanks:
- Open the ink tank cover on the front of the printer.
- Remove the cap from each ink bottle and carefully insert the nozzle into the corresponding tank.
- Squeeze the bottle gently to fill the tank, taking care not to overfill it.
- Repeat this process for each ink color (cyan, magenta, yellow, and black) until all tanks are filled.
- Close the ink tank cover securely once all tanks are filled.
5. Loading Paper
Open the paper input tray located at the back of the printer and adjust the paper guides to fit the size of the paper you're using. Load a stack of plain paper into the tray, making sure it's not overloaded or bent. Slide the paper guides snugly against the edges of the paper stack to prevent misfeeds.
6. Connecting to Your Computer
Depending on your preference, you can connect your Epson ET-2850 printer to your computer using a USB cable or wirelessly over a Wi-Fi network. Follow the instructions provided in the printer's user manual to establish the connection method that works best for you.
7. Installing Printer Software
Once the printer is connected to your computer, you'll need to install the necessary printer software and drivers. You can usually download the latest software and drivers from the Epson website or use the installation CD that came with your printer. Follow the prompts to complete the installation process.
8. Testing Your Printer
After installing the printer software, it's a good idea to perform a test print to ensure that the printer is functioning correctly. Print a test page or document from your computer to verify that the printer produces high-quality prints without any issues.
9. Exploring Additional Features
Now that your Epson ET-2850 printer is installed and set up, take some time to explore its additional features and capabilities. Experiment with scanning, copying, and mobile printing functions to maximize your printer's potential.
10. Troubleshooting
If you encounter any issues during the installation process or while using your Epson ET-2850 printer, refer to the troubleshooting section of the user manual or visit the Epson support website for helpful tips and guides.
Conclusion
Congratulations! You've successfully installed your Epson ET-2850 printer and are ready to start printing, scanning, and copying with ease. By following the steps outlined in this guide, you can ensure a smooth and hassle-free setup experience and enjoy high-quality prints for years to come.
For additional assistance or troubleshooting, don't hesitate to refer to the user manual or contact Epson customer support for personalized assistance.
The Epson ET-2850 is a multifunction printer designed to offer high-quality printing, scanning, and copying capabilities while minimizing operational costs with its EcoTank technology. If you've recently acquired an Epson ET-2850 and are eager to set it up for optimal performance, you're in the right place. In this comprehensive guide, we'll walk you through the step-by-step process of setting up your Epson ET-2850, ensuring a smooth and hassle-free setup experience.
1. Unboxing Your Epson ET-2850
Start by carefully unpacking your Epson ET-2850 printer from its packaging. Ensure that all included components, such as the printer unit, ink bottles, power cord, user manual, and installation CD, are present and undamaged.
2. Finding the Ideal Location
Select a suitable location for your Epson ET-2850 printer. Choose a flat, stable surface near a power outlet and your computer or wireless network router. Ensure that the area is well-ventilated and free from obstructions to allow for proper airflow around the printer.
3. Connecting the Power
Plug one end of the power cord into the back of the printer and the other end into a nearby power outlet. Press the power button to turn on the printer and wait for it to initialize.
4. Filling the Ink Tanks
The Epson ET-2850 features refillable ink tanks, eliminating the need for traditional ink cartridges. Follow these steps to fill the ink tanks:
- Open the ink tank cover located on the front of the printer.
- Remove the cap from each ink bottle and carefully insert the nozzle into the corresponding tank.
- Gently squeeze the bottle to dispense ink into the tank. Be careful not to overfill the tanks.
- Repeat this process for each ink color (cyan, magenta, yellow, and black) until all tanks are filled.
- Close the ink tank cover securely once all tanks are filled.
5. Loading Paper
Open the paper input tray located at the back of the printer and adjust the paper guides to fit the size of the paper you'll be using. Load a stack of plain paper into the tray, making sure it's not overloaded or bent. Slide the paper guides snugly against the edges of the paper stack to prevent misfeeds.
6. Connecting to Your Computer
Depending on your preference, you can connect your Epson ET-2850 printer to your computer using a USB cable or wirelessly over a Wi-Fi network. Follow the instructions provided in the printer's user manual to establish the connection method that works best for you.
7. Installing Printer Software
To ensure seamless communication between your computer and the Epson ET-2850 printer, you'll need to install the necessary printer software and drivers. You can usually download the latest software and drivers from the Epson website or use the installation CD included with your printer. Follow the prompts to complete the installation process.
8. Testing Your Printer
After installing the printer software, it's a good idea to perform a test print to verify that the printer is functioning correctly. Print a test page or document from your computer to ensure that the printer produces high-quality prints without any issues.
9. Exploring Additional Features
Now that your Epson ET-2850 printer is set up and ready to go, take some time to explore its additional features and capabilities. Experiment with scanning, copying, and mobile printing functions to maximize your printer's potential.
10. Troubleshooting
If you encounter any issues during the setup process or while using your Epson ET-2850 printer, refer to the troubleshooting section of the user manual or visit the Epson support website for helpful tips and guides.
Conclusion
Congratulations! You've successfully set up your Epson ET-2850 printer and are ready to start printing, scanning, and copying with ease. By following the steps outlined in this guide, you can ensure a smooth and hassle-free setup experience and enjoy high-quality prints for years to come.
For additional assistance or troubleshooting, don't hesitate to refer to the user manual or contact Epson customer support for personalized assistance.
Unlocking Efficiency: A Complete Guide to Epson ET-2850 Driver Download
The Epson ET-2850 is a versatile all-in-one printer known for its high-quality prints and cost-effective EcoTank technology. To unleash its full potential, you need to ensure that you have the correct printer driver installed on your computer. In this comprehensive guide, we'll walk you through the step-by-step process of downloading the Epson ET-2850 driver, ensuring seamless printing experience and optimal performance.
1. Importance of Printer Drivers
Printer drivers play a crucial role in facilitating communication between your computer and your printer. They act as a bridge, translating the data from your computer into a format that your printer can understand. Without the proper printer driver, your computer may not be able to communicate with your Epson ET-2850 printer, resulting in printing errors or inability to print altogether.
2. Finding the Correct Driver
Before you begin the driver download process, it's essential to ensure that you're downloading the correct driver for your operating system. Visit the official Epson website and navigate to the support section. Enter "Epson ET-2850" in the search bar and select your operating system from the options provided.
3. Downloading the Driver
Once you've selected the correct driver for your operating system, click on the download button to initiate the download process. The driver file will be downloaded to your computer, typically in the Downloads folder or the location specified by your web browser.
4. Installing the Driver
After the driver file has finished downloading, locate the file on your computer and double-click it to begin the installation process. Follow the on-screen prompts to complete the installation, ensuring that you carefully read and agree to any terms and conditions presented during the installation process.
5. Connecting Your Printer
Once the driver is installed, you'll need to connect your Epson ET-2850 printer to your computer. If you're using a USB connection, connect the printer to your computer using a USB cable and power on the printer. If you're using a wireless connection, follow the instructions provided in the printer's user manual to connect the printer to your wireless network.
6. Testing the Printer
After the printer is connected, it's a good idea to print a test page to ensure that the printer is functioning correctly. Open a document or photo on your computer and select the print option. Choose your Epson ET-2850 printer from the list of available printers and click print to send the document to the printer. Verify that the document prints successfully and that the print quality meets your expectations.
7. Updating Printer Drivers
It's essential to keep your printer drivers up to date to ensure optimal performance and compatibility with your operating system. Periodically check the Epson website for driver updates and install any available updates to keep your printer running smoothly.
8. Troubleshooting Driver Issues
If you encounter any issues during the driver download or installation process, refer to the troubleshooting section of the user manual or visit the Epson support website for assistance. Common issues may include compatibility issues with your operating system or errors during the installation process.
Conclusion
Congratulations! You've successfully downloaded and installed the Epson ET-2850 driver, ensuring seamless communication between your computer and your printer. By following the steps outlined in this guide, you can enjoy high-quality prints and optimal performance from your Epson ET-2850 printer.
For additional assistance or troubleshooting, refer to the user manual or contact Epson customer support for personalized assistance.
Installing the Epson Universal Print Driver - Windows
The Epson Universal Print Driver supports multiple printer languages, such as PCL and ESC/P-R, and can be installed on a Windows computer.
- Download the EPSON Universal Print Driver from epson.com/support/wf6090.
- Double-click the downloaded package.
Follow the on-screen instructions until you see this screen:
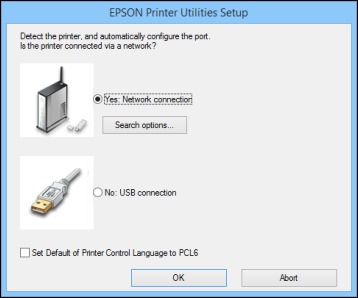
Select Yes: Network connection and click OK.
Note: Select the Set Default of Printer Control Language to PCL6 checkbox if you want to set the default printer language to PCL6. Leave this option deselected to set the printer language to ESC/P-R. (You can change this setting later as needed.)After the software finishes searching for products, you see a screen like this:

- Do one of the following:
- If you are installing one product, make sure Add EPSON Universal Print Driver is selected and continue with the next step.
If you are installing more than one product, select Add found printers and go to step 9.
Note: You can customize and filter your product search results by clicking Display Settings.
- Open the Select a port to connect a printer menu and select an existing printer port, if necessary. Otherwise, skip this option to create a new port automatically.
Select the product you want to install from the Found Printers list.
Note: Deselect the Set as default printer checkbox if you do not want the product to be set as your default printer.- Click OK, then skip the remaining steps.
If you are installing more than one product, select the products from the Found Printers list and click Add to Printer Folder.
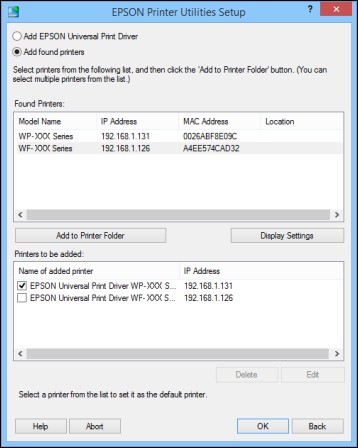
The selected products appear in the lower section of the screen.
- Select the checkbox next to the product you want to make your default printer, if necessary.
- Click OK.